Up for sale is our USB version of the Lasersaur Shield (OpenSource) adaption for K40, K60, Vevor, or GDFGI001 Laser Driver replacement of standard Moshi controller. Our product doesn't require any USB keys and also works for Windows and Linux (Mac soon to be supported). This board replaces all the MoshiDraw limitations. The laser driver also cuts in vectors (straight/curved lines point to point cut outline) for cutting as well as line rastering pixel images. The standard installed Moshi only provides rastering and not true vector cutting, whereas this USB solution does both. Easy installation with an included CD. The script installer for Linux (Mint/Ubuntu based only) is one command line install and an EZ one step InstallShield executable setup application for Windows. The Lasersaur Application is run inside a Firefox window, so you will need to have Firefox installed as a prerequisite application in your operating system.
See How Easy It Is To Use LaserSaur to Cut and Raster (click here .pdf)
In order to make this solution work you will need moderate computer and electronic skills. You will need to have a recent version of Firefox installed on your Linux or Windows computer. For windows you will use our installation CD that comes with the hardware and run the setup application in the Windows install directory. After installation the user will need to reboot the computer manually for the changes to be effect, make sure the hardware is plugged into the computer USB port before reboot. Likewise Linux will require you run the install shell script (.sh) file and also require a reboot. After that the Lasersaur Desktop start shortcuts will be on the computer's Desktop.
Installation and Eula Terms of Agreement:
Warning these lasers represent a danger to inexperienced technicians or people with no skills, we assume no liability for either your laser hardware or personel/employee risk. Miles-Milling is void of liability for incorrect installation of part and by installing this replacement laser controller the technician is acknowledging his duty and liability to follow all the instructions in this manual. We provide no interlocking protection or detection hardware, so for safety you may need to formulate your own solution. You will be responsible for all safety issues. Miles-Milling.com also does not warrant either the contoller nor the hardware that is adjoined to the replacement, nor do we assume any responsibility to usage or personel using this controller.
For further disclaimers please read the Eula, installation means acceptance of the terms and conditions.
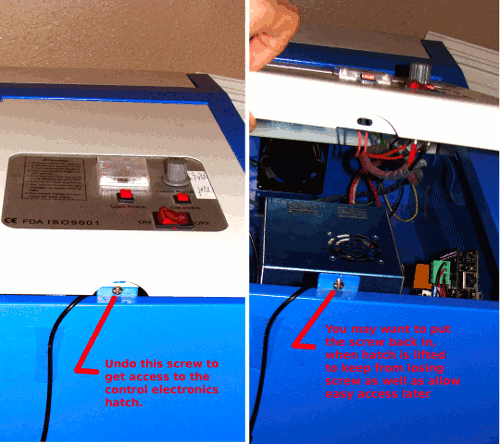
| Installation of this product is unbelievably easy. First make sure your Laser is powered down before doing any installation, if power is applied while installing it can damage your laser or controller!! We'll need access to the electronic compartment hatch of the K40 laser system. Before we can begin replacing the standard raster controller.
|
|
 |
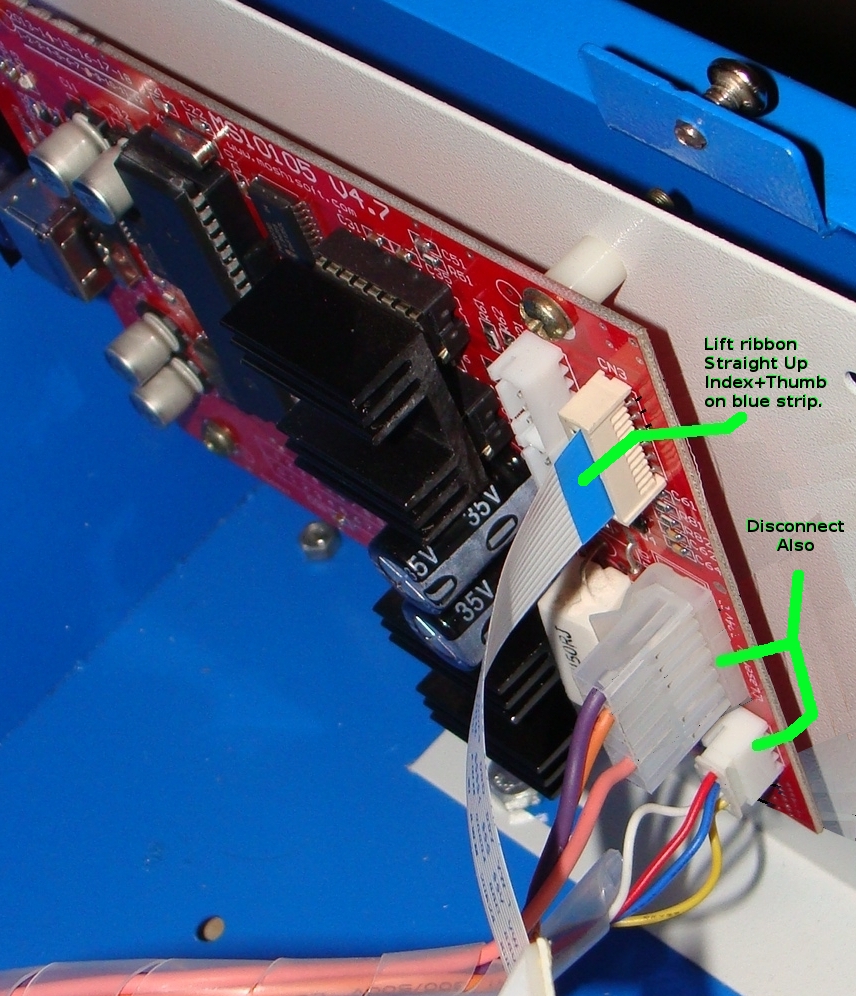
| You can choose to keep the MoshiDraw controller inside of the chassis, though I'm not sure why you'd want to do that. If you keep the original MoshiDraw controller you'll need to drill a hole large enough through the side of the chassis to let in the USB cable. Let's take a look at the chassis with the Moshi Draw board and the cables that must be disconnected to be reconnected to our board. Note to disconnect the ribbon cable just pull it straight up out of its connector on the MoshiDraw controller board, pull on the ribbon cable where the blue strip is located with index and thumb pinched over this area.
|
|
 |
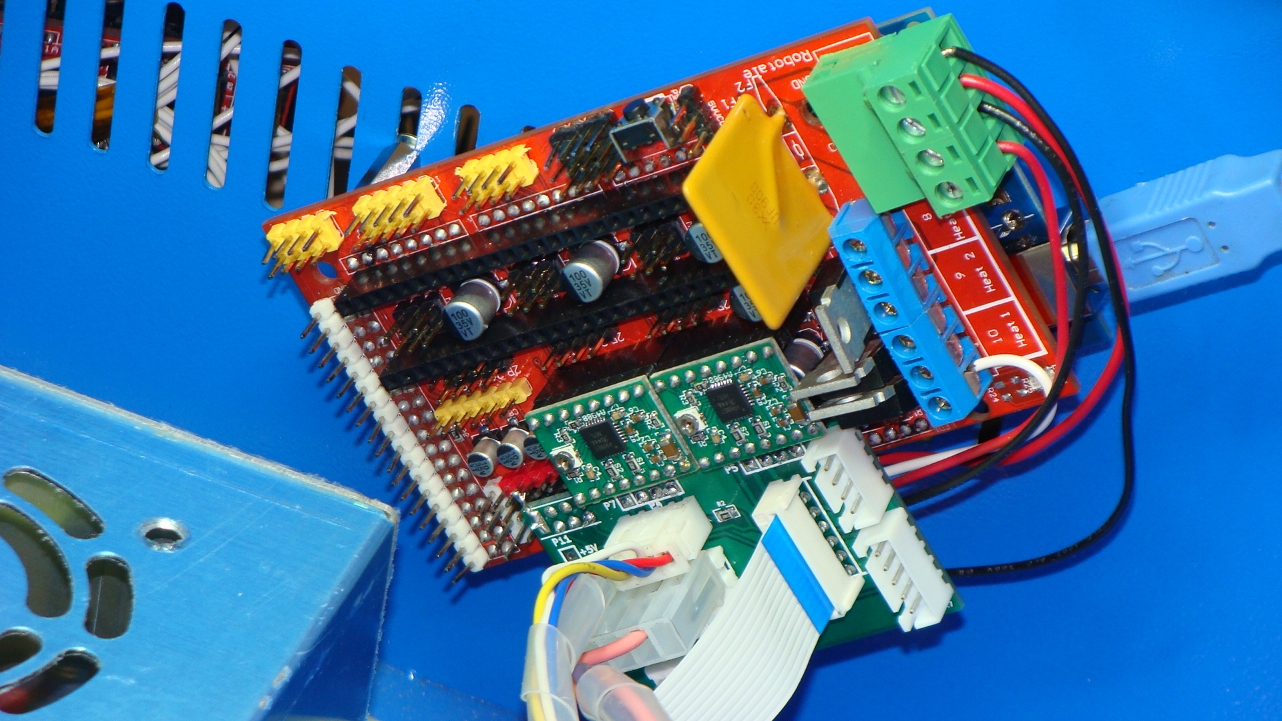
| Next we start to reconnect various cables from the MoshiDraw controller to our Lasersaur Shield controller instead. We also need to add USB connector for communication to our replacement controller. Make sure the orientation of cables and polarity exactly match the picture below.
|
|
 |
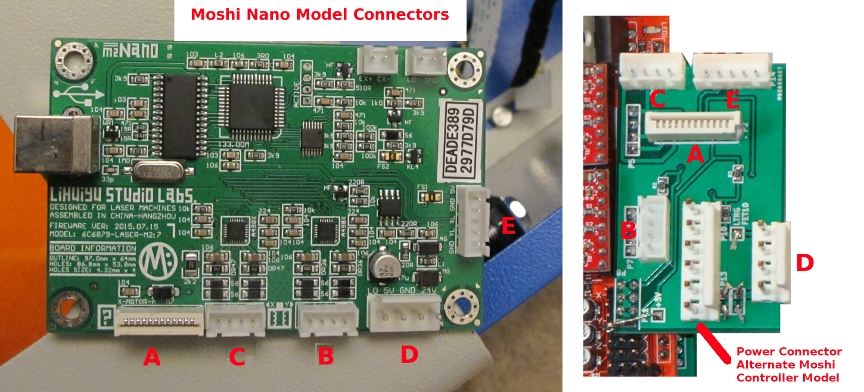
| We recently redesigned our connector board so that it could accept all old as well as new Moshi controller cables. Please see the following picture to see the compatible connectors. The old adapter connector has been obsoleted, but realize that even those old cables can now work on our more universal layout below:
|
|
 |
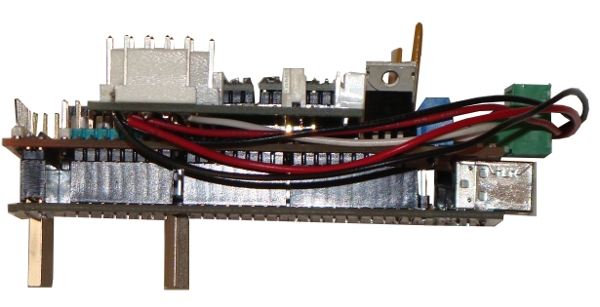
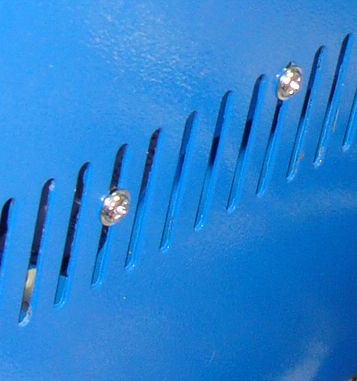
| We aren't responsible for proper mounting, and the following method has some risks as any other. You will be responsible for making sure that how you mount does not cause shorting on the Lasersaur Shield. The product comes standard with two standoffs as shown below. Obviously the best way to mount would be to drill side holes in the laser chassis exactly matching the standoffs. Though of course one would have to be careful that none of the metal drilling shavings ended up shorting out the laser power supply or other electronics in the electronics bay. The solution we advocate is using the venting slots on the side of the machine as shown in the next instructional photo below this one.
|
|
 |
| After getting mounted make sure you tighten all screws and standoffs as tight as can go so that it has no degree of motion or wobble left between the Lasersaur Shield and the chassis.
|
|
 |
Easy Software Usage and Control of LaserShield:
Software:
Lasersaur (Open Source) provides a wonderful software layer using the computer's browser and perl scripts to render its software nearly operating system independent. It's also unbelievably simple and along with using the free Inkscape included application we can quickly make raster files to engrave images, or use dxf and svg vector files to load directly outline cutting. By using Inkscape one can even convert outline pixel graphics such as jpgs and bitmaps to vector line vector trace cutting (youtube demos for further information). The installation is simply to run the executable on the CD installer for your supported operating system subfolder. Then connect the hardware via a USB cable to the computer and perform a reboot. An easy run start shortcut is added to your Desktop to begin Lasersaur for you K40. We'll go through the steps of doing typical flow of using LaserSaur below.
Being the project is Open Source we are required to provide all the source code used for the project and provide it on a CD with purchase along with the installer and binary compilations. You can also get the source code visiting http://www.lasersaur.com/. We are not responsible for any device that has it's firmware upgraded or changed from the default we ship with your device. Please do not flash new firmware without assuming all responsiblity for the results before hand! We have disabled this firmware upgrade option for concern of compatibility issues as a hidden menu item to prevent this from happening by accident by ordinary users, so it takes a purposeful attempt by a person to change the firmware and as such a concerted effort to bypass these safeguards means you assume all compatibility and bricking issues if done.
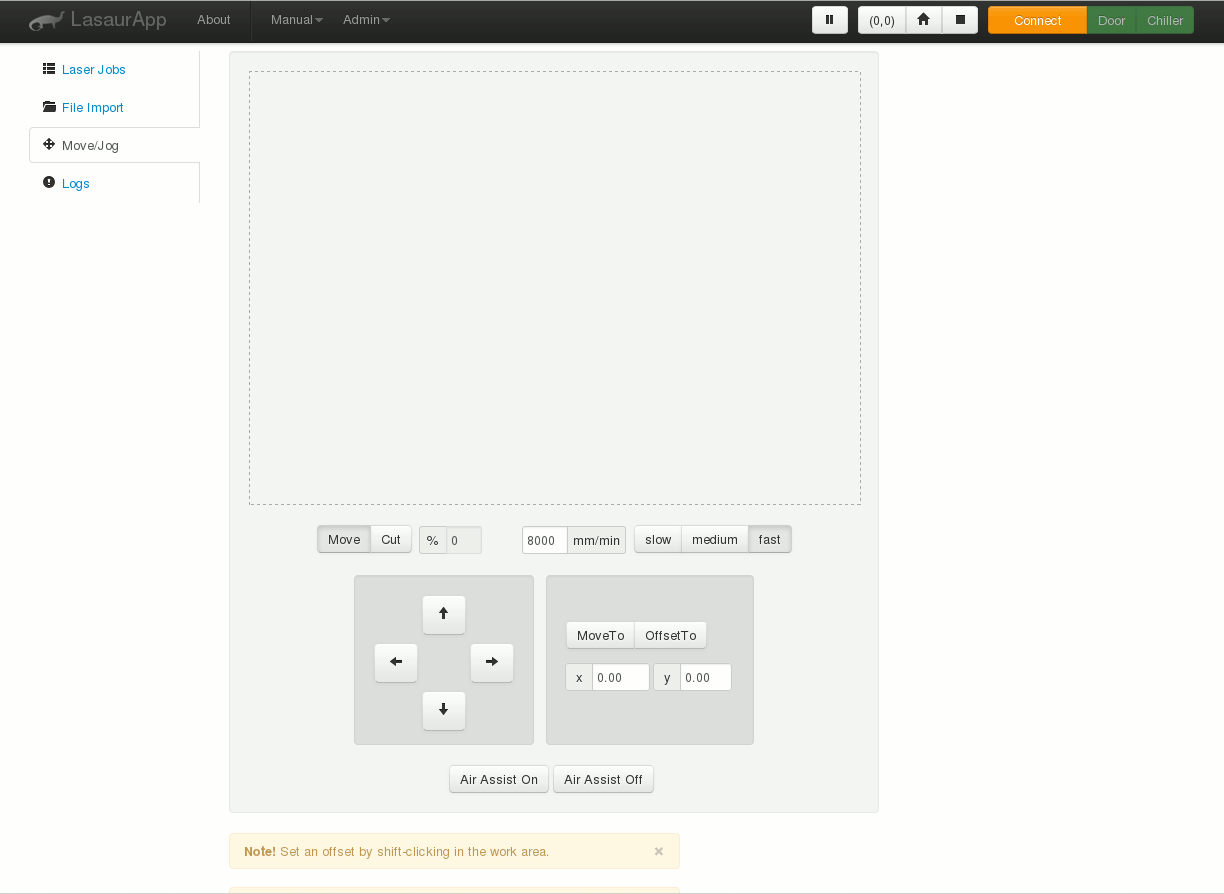
| Begin the Lasersaur start icon shortcut on your Desktop after finishing installation and reboot of previous step. In a few moments a command line script will open followed by your Firefox browser (note that you must have Firefox not Internet Explorer as default browser). The webpage of the browser will look like the following picture. Afterwards, left mouse click on the yellow connect button:
|
|
 |
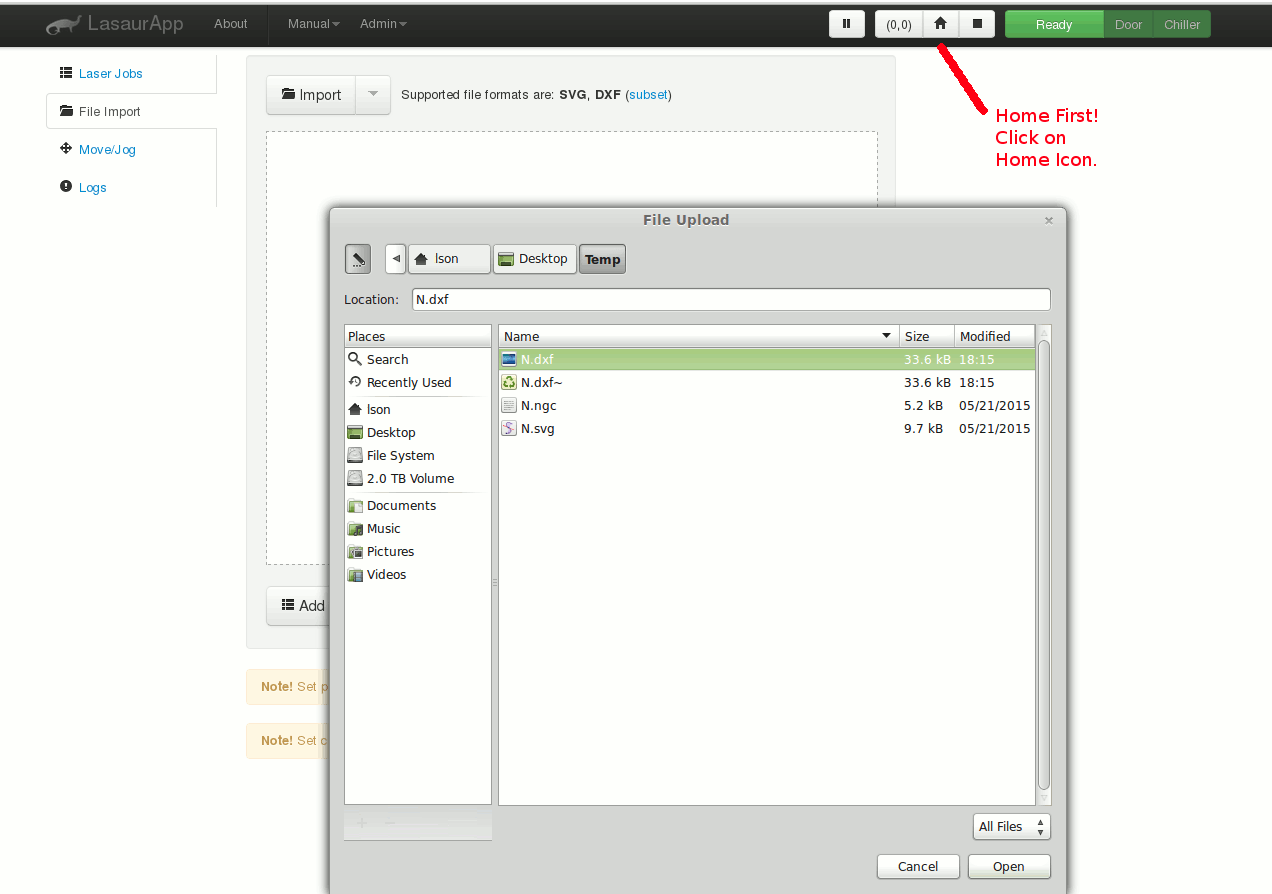
| After the green "Ready" shows up instead of the yellow "Connect" of previous picture. We need to do a homing first by left mouse click the house icon just to two items left of the green "Ready". Then click on the "File Import" on the left hand Pane between "Laser Jobs" and "Move/Jog". Then left click on the import folder tab/button upper middle pane. A File Upload dialog will appear and you can now descend down the folder hierachy to your .svg or .dxf vector file you want to cut.
|
|
 |
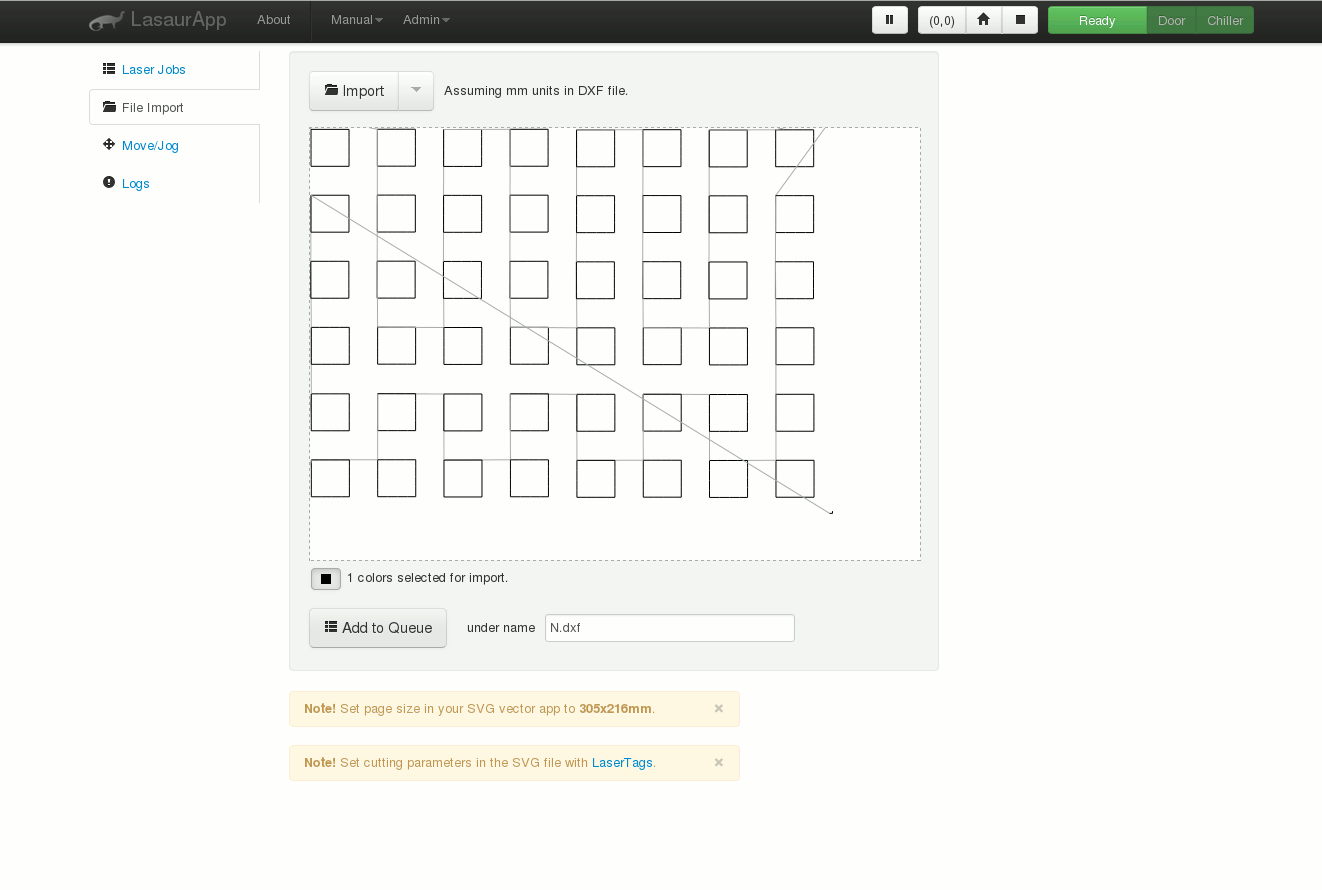
| After the file import of the previous step the cutting outline will show up in the laser cutting workspace pane as shown below. We can now "Add to Queue" by clicking on the lower middle pane button appropriately marked:
|
|
 |
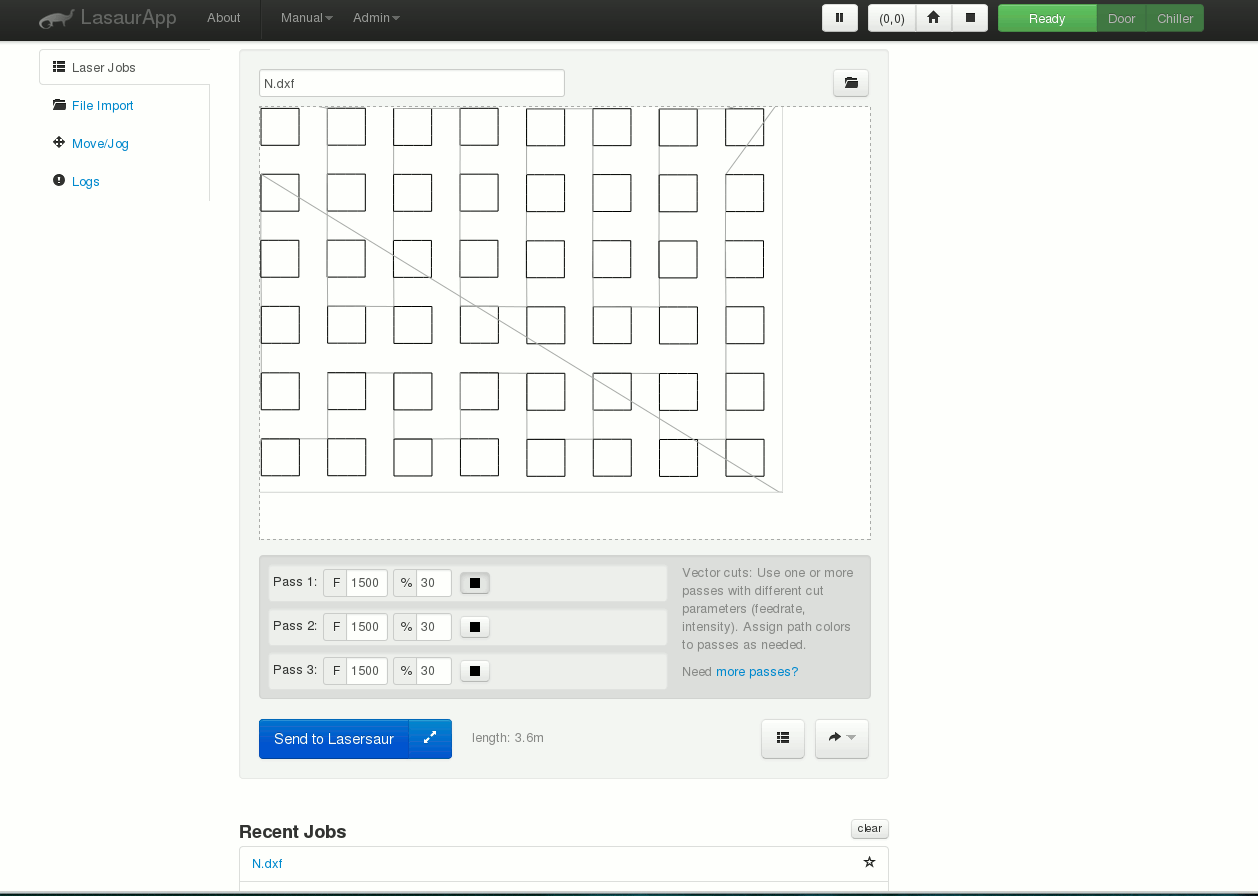
| Here we can assign different feedrates "F" (laser head velocity) along with the PWM (Pulse width modulation) regulation maximum 100% of current dial setting of the K40 amperage. In the snapshot picture below the modulation is set to 30% of on time period meaning a 30% reduction of laser amperage. Finally clicking on the "Send to Lasersaur" button will begin execution of the cutting. One should visit Lasersaur main webpage to see how to set with graphical text the various passes in the same inkscape graphics picture. This can be incredibly powerful in doing multiple and differentiating passes or just simply doing a single and simple pass over all the cuts the same. Again further details of the power and simplicity of generating .svg and cutting files can be viewed directly on the www.Lasersaur.com application website. For example me personally I like to keep the files for various cuts separate and just load each up by themselves and execute, however Lasersaur also has a way to specify mutiple passes with LaserTags in the same file upload http://www.lasersaur.com/manual/lasertags
|
|
 |
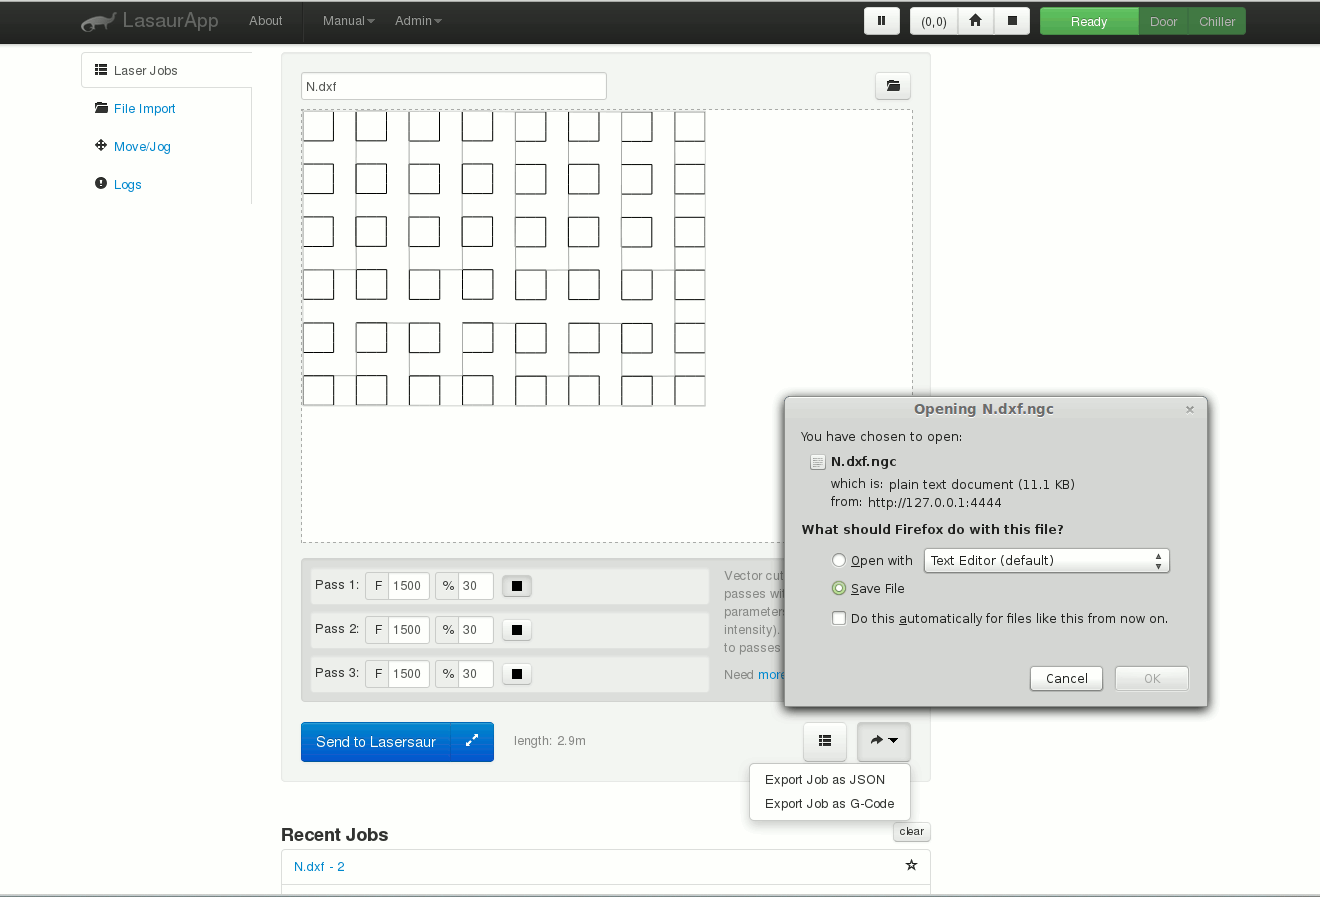
| One of the things I really love about the Lasersaur browser application is that you can actually save the computed machine paths into gerber .ngc files. And yes you can also load .ngc files from other gerber applications instead of vector .svg and .dxf files in the "Import Tab". To save the configurations gerber just click on the lower bottom right hand corner curved arrow as shown below. A dialog will appear to where you want to save the gerber. If you want to import this gerber or any other gerber instead of the .svg it is important to know that the file must have an extension .ngc and not say .gcode or other file extension for it to appear in the directory listing.
|
|
 |
Using Inkscape to Create Rastering Machine Code (.ngc), And/Or Vector Files (.svg/.dxf) for LaserSaur
Our CD Installer setup is packaged with free Inkscape and the rastering extension also installed. Please note that the sales price is not included to cover the software Inkscape or the extension as they are provided totally free according to GPL along with the source code also on the same installation CD if so desired. The only cost to product is entirely the hardware solution, not even does the sales price include CD distribution which is also free of charge. With that said Inkscape is not the only package one can use to generate vector files .svg/.dxf. Free packages like LibreCad and proprietary packages such as AutoCad easily create 2-D .dxf vector files. Linux Mint/Ubuntu may require you install the Inkscape packages through your OS package source FOSS manager such as synaptic, you can also use a terminal and type "sudo apt-get install inkscape" if our installer is unsucessful at installing the inkscape independently inside the Linux OS. The Linux rastering extension files must be installed after inkscape application if for any reason the standard install fails to install inkscape automatically, so again you might have to re-run the Linux install shell script. With windows this will not be an issue as the InstallShield always installs the Inkscape along with the rastering extension setup and in the correct order.
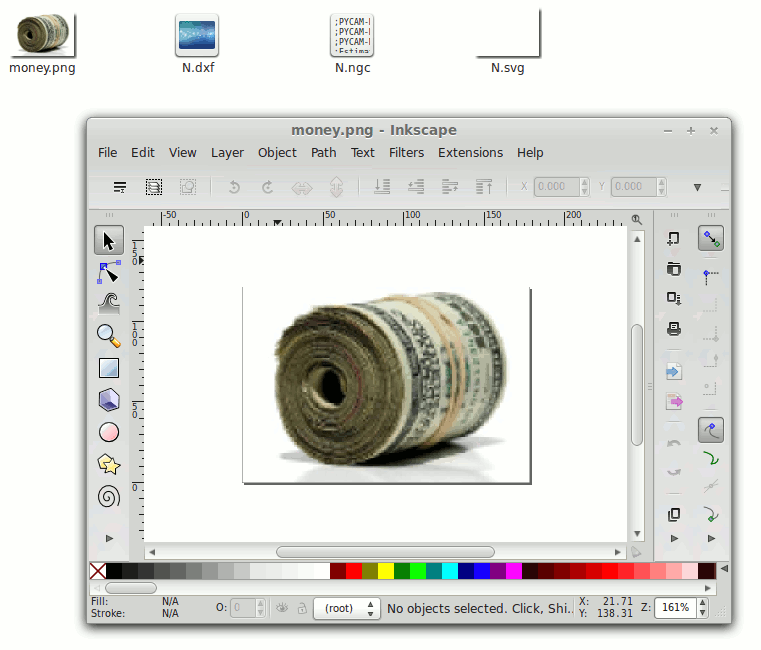
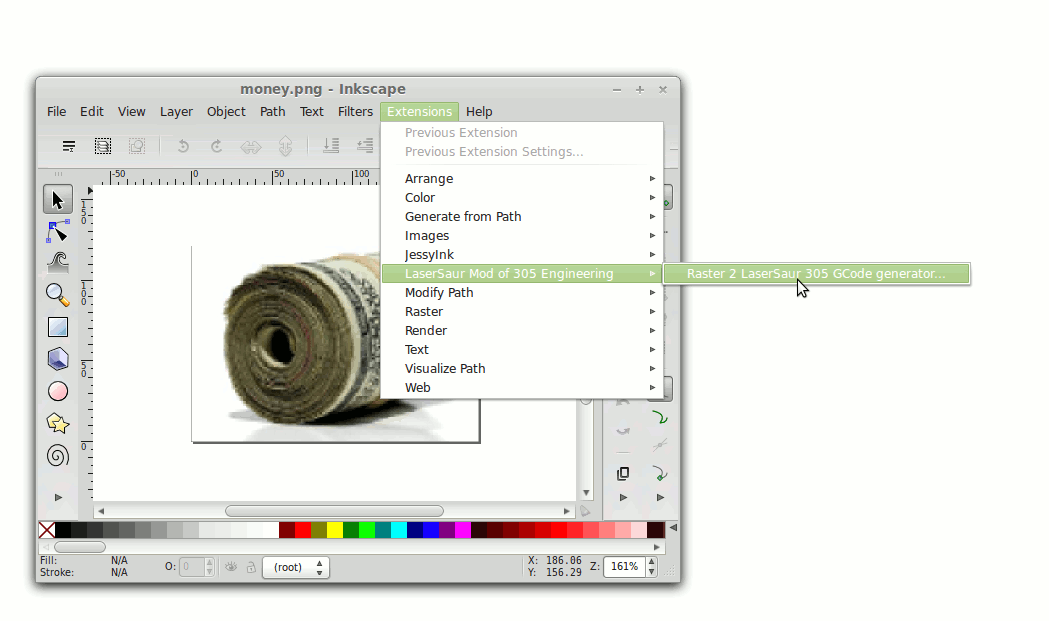
| Let's proceed so for Windows or Linux (menu items) please start the Inkscape shortcut on your computer Desktop after using our Installation CD. We are going to open a money.png file as an example in our folder directory as shown below. In Inkscape choose file open, then choose your graphical image file you want to create a rastering machine file for using with your LaserSaur.
|
|
 |
| Next we need to convert this image to a line by line pixel rastering scan. We do this using the 305 engineering extension. As shown in the snapshot below open up the Extension pulldown menu and choose the submenus accordingly.
|
|
 |
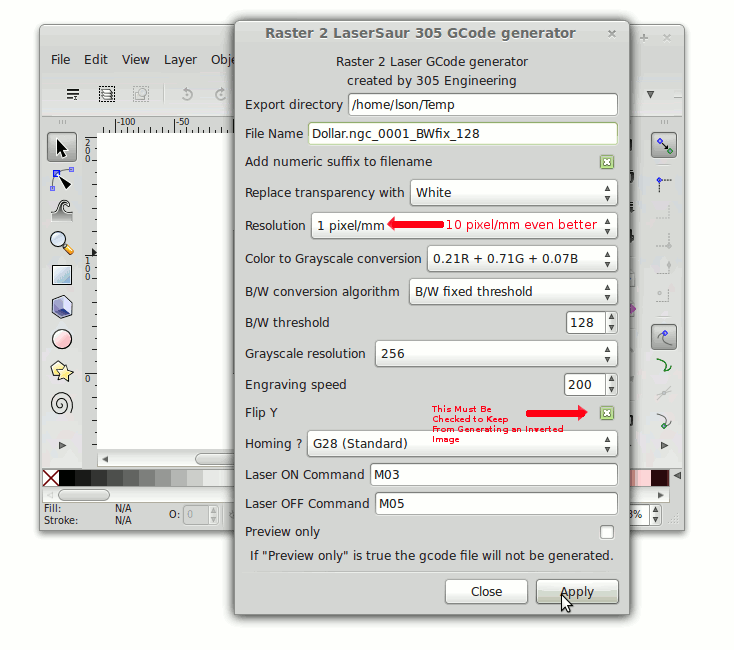
| We are now able to specify the resolution pixels per mm and all other parameters for the conversion of the graphics file to a raster machine code file.
|
|
 |
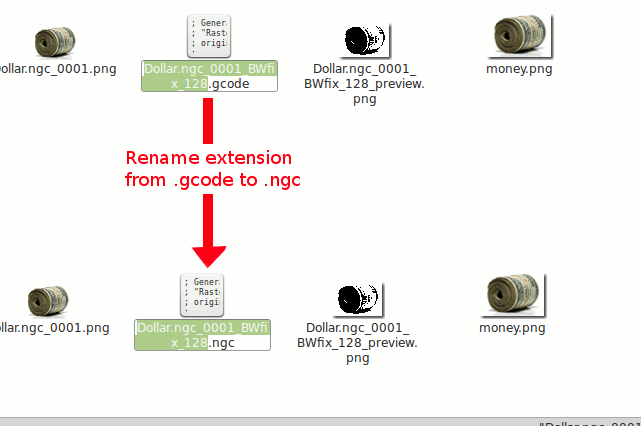
| The output file will have a .gcode extension, we will need to change this to .ngc file type extension for Lasersaur application to know the file type. This step is no longer needed in our newest modified extension module as it puts out a .ngc file directly, if you suspect that you have an older installer that still requires this manual extension renaming please contact us for your free update patch.
|
|
 |
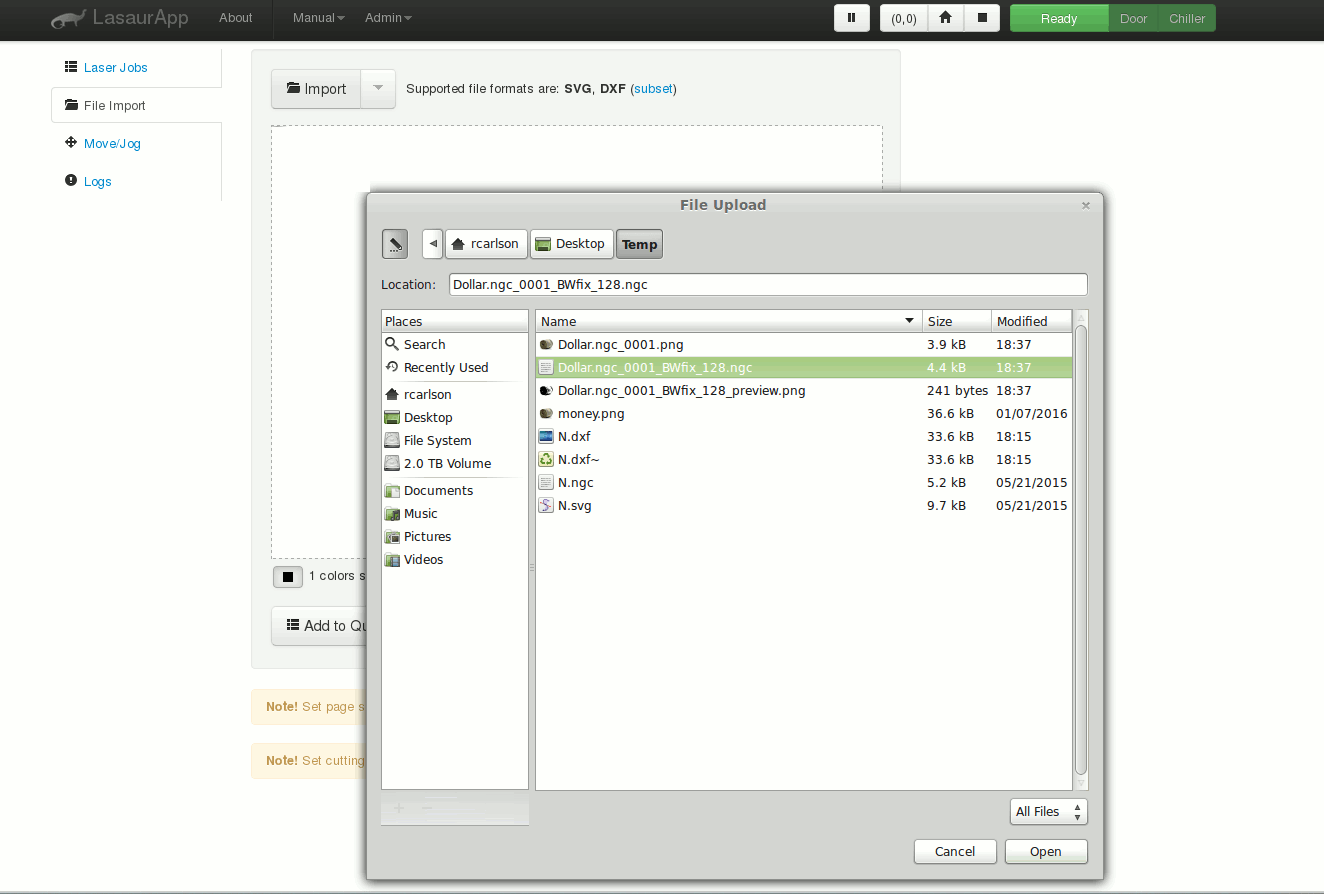
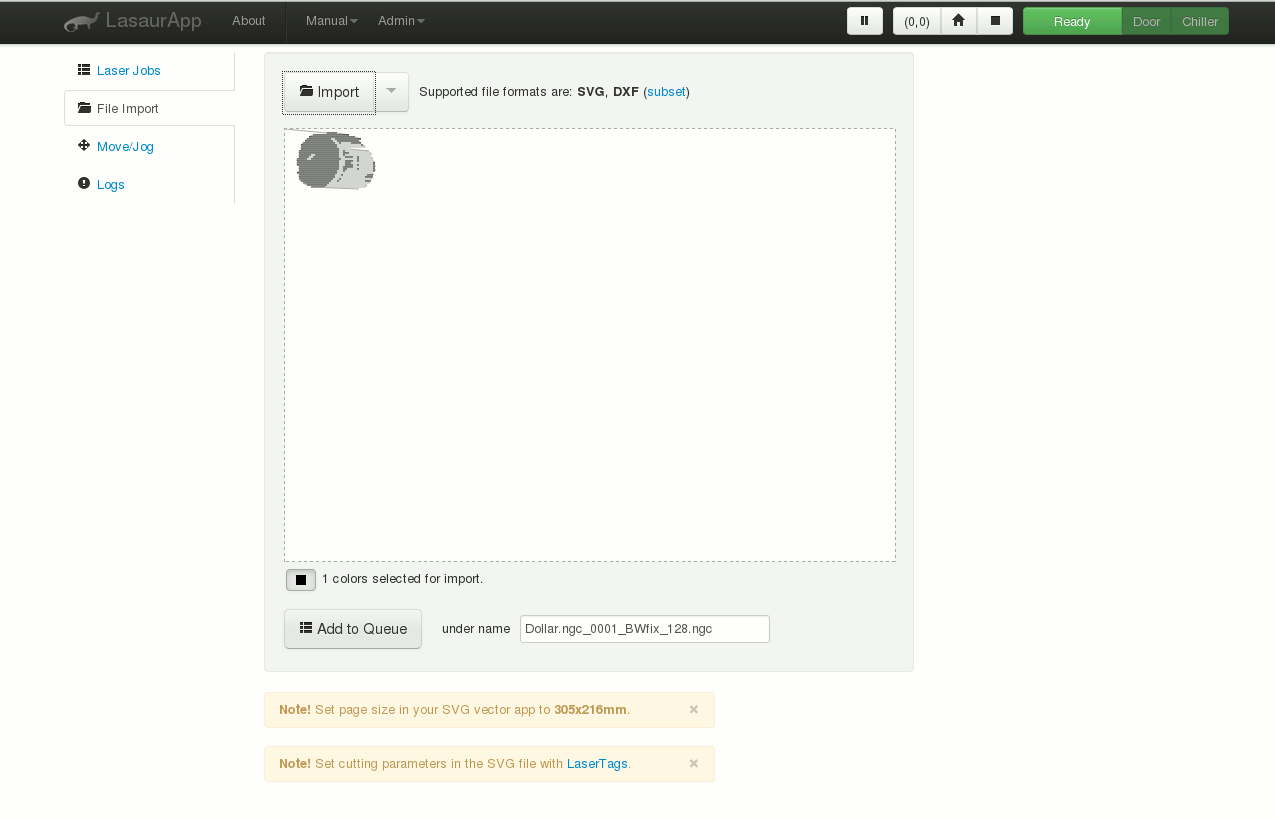
| We can now start the Lasersaur application with the Desktop start shortcut and do a file import, choosing the just created and rename .ngc file. Imported we will see the scan raster laser etching to be done.
|
|
 |
| Again like the previous instruction we can "Add to Queue" choose the path feedrate as well as percentage intensity from all the time on condition firing. And finally send to the Lasersaur controller for actualization.
|
|
 |
As stated one isn't limited to using Inkscape to do .svg/dxf vector files as we have also had good results with the free 2-D graphical program LibreCad. However since Inkscape provides a one stop solution we used it as our standard installed side application for the free source installer CD. With that I thought I'd provide a further youtube video showing how to use Inkscape to convert pure pixel graphics into trace outlines if so desired. This complexity isn't necessary as you can always use the rastering method above, but we provide it as an alternative for the more is better consumer of possibilities.
Need an Easy Tutorial How To Do A Project of Rastering and image as well as Cutout with LaserSaur (click here .pdf)
How to use Inkscape to Convert a graphic to SVG
Conclusive Information about this Product
This product comes ready to install and replace the standard MoshiDraw driver in the K40 Chinese Laser Cutter. This product removes many of the restrictions of the MoshiDraw Software, in particular the requirement for a USB dongle, either Linux or Windows can utilize the application (Mac to also be supported in near future). This shield product still requires a USB control port and cable and does not provide an ethernet solution, though one can also buy an ethernet version direct from LaserSaur (generic laser not K40 connectors default) our product is the lower cost USB solution made for pin for pin replacement of the K40 controller. We also provide an ethernet LinuxCNC version of beagleboard as another different and unique product also a pin for pin compatible replacement for the K40, so if interested please visit our other product listings at https://www.miles-milling.com Also this solution will allow true vector or line cutting, unlike the standard Moshi Solution that only allow raster or dot/point scanning, this is absolutely for accurate and real laser cutting. Also by controlling the feedrate one can effectively increase the intensity of cutting by allowing the laser beam to stay at any point to point on the curve cutting arc to take longer. Installation is an easy cable swap. The entire firmware and software is OpenSource and provided online at Lasersaur.com along with the installation CD that we send free with every purchase. The CD also provides shell installer for Linux and an automated setup InstallShield program to set the registry, load all the needed applications such as Inkscape, and automatically provide the drivers for the Lasersaur. The Lasersaur application requires a Firefox browser as default, we found bad results using Internet Explorer so the user will have to install Firefox and set as his default browser before using our automatic installation. A computer reboot after setup installation is also required. End results is user interface that is easy to use and very versatile over a variety of operating systems. Thank you all of the opensource community for this extremely economical and excellent product in particular the open source team at Lasersaur.com, the 305 engineering extension development team, and Inkscape product deveopment. Purchase of this product means that user is also acknowledging all licence, Eula, and terms and conditions of the GPL and free source developer's requirements.


